

Showing posts with label Progress. Show all posts
Showing posts with label Progress. Show all posts
Thursday, June 11, 2009
Kewpie step 3
Our painting of the Kewpie mayo should be nearly completed by the end of the week. For now here is a sneak peek at some of the bottle rendering and text/graphics.

Wednesday, June 10, 2009
Whirly Pop whirling to completion
The whirly pop, a piece I feared may take longer then it did seemed to race to completion. Once all of the initial block-ins dried it was a matter of controlling transparent paint for the dark tones and semi-opaque tones for the lights. Overall the painting is about 95 percent done and once this layer dries we will tweak the last 5 percent. Despite our success it was still no easy task to render the 35 or so different color bands and the other 35 or so white bands that separate the colors.
P.S. - The final photo should be up this weekend.

P.S. - The final photo should be up this weekend.

Sunday, March 22, 2009
Status Update
Bon-bon: Done
Morinaga: Done
Teacup: Saucer, highlights, background layer are left (~85% done?)
Lollipop: Shadow detail, finishing work (80%)
Dots: Modeling the dots about halfway done, more shadows, finishing glaze and detail left (~67%)
Kewpie: Not very far along-- (35%)
Soon the three will zip right out..... Then on to Kewpie and the next ones.... We want about 10-12 ideally....
Brett is copying some Bargue on the side, and Lana is doing some illustration (building a portfolio) and training to get a little faster at that. Wellp... that's it for now!
Wednesday, March 18, 2009
whirly pop update
Last week I finished blocking in the whole under-painting for the giant whirly pop painting. Every one of the 40 or so color areas was applied thick and stroked with the brush hair, this interpretation really gives it a nice uniform direction for the light to follow as it hits the piece. After these were applied, I went in and painted the grey divisions that seperate each color. Right now everything is flat, but over this layers comes a couple of glazes to develop color intensity and form.


Wednesday, March 11, 2009
Kewpie 2
 3. Acrylic wash in
4. Grey oil background
Things are going slowly but surely; we're looking forward to warm weather.
Monday, March 9, 2009
Kewpie 1
 1. Start of the pencil drawing
2. Red acrylic paint
Details below of steps between 1 and 2:
 1a. Pencil drawing (some colored pencil)
1b. Colored pencil logo & lettering
1b. Acrylic painted logo & lettering
Ingredients: Vegetable oil, Egg Yolk,Vinegar, Salt, Monosodium Glutamate, Spices.
Contains: Egg
Tuesday, February 17, 2009
Lollipoop
This one has been funny. Brett is poking this one because somehow the extremely thick cad red has dried in a few days (I don't think that color dries very quickly...). We speculate that this is attributed to the absorbency of the acrylic paint wash-in and gesso underneath...

There's a neat technique being done on this... stolen from ideas and practice about house painting.... more on that later (maybe).
Techniques unrelated, I think I'd like to paint some taffy after this!

There's a neat technique being done on this... stolen from ideas and practice about house painting.... more on that later (maybe).
Techniques unrelated, I think I'd like to paint some taffy after this!
Monday, February 16, 2009
Stick it to the buttcup
I put a dent in some of the work on the teacup, painting some wet into wet on some of the rims and handle. Blargh! Also, prior to this, I did the whole inside of the cup.
The blue in the saucer has been glazed in by Brett but will require more work... much like painting back into the bon-bon's red glaze.
This blue glaze was bad. It was like being in a hospital and your patient goes into cardiac arrest or some crazy shock and you have about 1 second to rig up some crazy way to jump start his heart again... ANYWAYS, in case anyone EVER needs to know this, I shall explain:
The blue glaze took two attempts. The first was liquin, in hopes of making it dry much faster. That failed since that would not become smooth (brush strokes). The alkyd type mediums have a tendancy to layer on themselves... creating an uneven covering (that is unless you are glazing like a 2 x 2 " area..)
The second was going to be lindseed oil but since that didn't stick to the too-dried grisaille by this time, we used a combo of liquin and lindseed oil. Well, we had to sacrifice.... there were brush strokes... But then we almost dropped dead because it was dry the next morning.
 One way, or another....
...I'm going to drag this painting to the finish...kicking and screaming.
The blue in the saucer has been glazed in by Brett but will require more work... much like painting back into the bon-bon's red glaze.
This blue glaze was bad. It was like being in a hospital and your patient goes into cardiac arrest or some crazy shock and you have about 1 second to rig up some crazy way to jump start his heart again... ANYWAYS, in case anyone EVER needs to know this, I shall explain:
The blue glaze took two attempts. The first was liquin, in hopes of making it dry much faster. That failed since that would not become smooth (brush strokes). The alkyd type mediums have a tendancy to layer on themselves... creating an uneven covering (that is unless you are glazing like a 2 x 2 " area..)
The second was going to be lindseed oil but since that didn't stick to the too-dried grisaille by this time, we used a combo of liquin and lindseed oil. Well, we had to sacrifice.... there were brush strokes... But then we almost dropped dead because it was dry the next morning.
 One way, or another....
Tuesday, February 3, 2009
Painting number 5
Lana and I have begun work on painting the whirly pop, it has been going very well so far. One day in on this, the surface of the panel was much more difficult to bring up to completion then the drawing or the under-layers. The sanding pad was getting gesso built up in it and wound up digging out little pits in the surface. Seeing as how it is not much fun sanding in the freezing cold we decided to bring it up to the studio and slake a layer of gesso over the surface and let it dry. Below is the current state, the background color is final and will look great with the finished painting candy even if it looks a little off right now.


Monday, January 19, 2009
After Some Elbow Grease
Here's the dum-dum further along--
 In the left (sorry for such a blurry pic), I've added one more layer of color (since the previous entry) for this preliminary loose sketch.
One layer later, after that last step dried, I just worked through the whole thing with brushes, directly painting the still life. I think one more touchup after this dries will finish off this little exercise.
Thursday, January 15, 2009
Start of small Dum-dum
I (Lana) started this this morning. For now I have to stop and let it dry before I can do the next layer. It's only 4x5 inches.

1: Light loose pencil drawing.
2: Initial block in with color (oil+turp). That dried very fast.
3: Second block in with color- now the following layers will stick better.
Next to come is lots of elbow-grease detail work (tightening up). I am trying to approach this in a very relaxed way and hoping as I work longer on it, it will get wherever it needs to go.
Wednesday, January 14, 2009
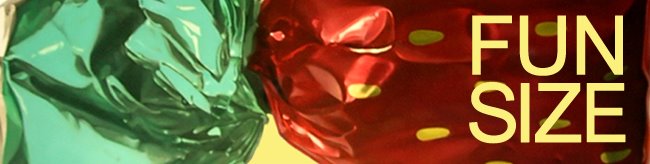
Bon-bon Progress
Here's the Bon-bon. It's just about finished. It's gone relatively smoothly. A better photo of the finished painting will come soon. This painting is 2x3 feet and is oil on mdf.
 We didn't have any photos from the beginning of it but you'll be able to see what we did.
1: This was taken after the drawing was done. At first we penciled and inked it with a Sakura Micron pen, but the gessoed surface ruined the pen. So we finished by oil painting over the pencil lines (see the center of the top half of the wrapper..ever so slightly thicker lines). After the drawing, the white was killed by some ivory black + turpenoid. The bottom and pieces of the top have a grey underpainting.
2: The grey underpainting is farther along.
3: With the underpainting complete, the red glaze was applied.
4: The green glaze went on the top part of the strawberry foil. The first layer of the yellow background was applied. The yellow didn't cover so well over that. (Learning from this, during this stage on the teacup, we tried to leave the area around the cup as clean as possible so that the background color would cover better.. but it was still messy..)
5: Grey seeds were painted back in.
6: Near completion! Another layer on the background yellow; heightened detail, color tweaks in the wrapper, yellow seeds glazed and painted in. The tiniest touches are the only things left to perfect it (but those tiny touches may have a significant impact).
This painting has been very fun to do. Only one main glaze of the red and green nearly finished the painting, thanks to the detailed grey underpainting.
Tuesday, January 13, 2009
Teacup Progress
Here is the teacup! It's only about half done... This painting has really been trouble from the start. Nothing ever dries on this thing... huge waits between layers. Siccatives don't really cut down the wait on this thing... the underpainting just hasn't dried... This is 3 x 4 feet on mdf panel.
 Here's what's going on:
1: The pencil drawing goes on the panel. Like I said, trouble-- We freehanded the line using a shipcurve and a grid proportioning system to make sure all the ellipses were accurate. (This took a little longer than you might expect...) We didn't fix the drawing, but instead, inked it with a Nikko spoon pen and black india ink.
2: Time to 'kill the white.' We washed in ivory black mixed with turpenoid/oms (This is parallel to the brownish yellow wash in for the Morinaga box).
3: Next, instead of painting the greyscale, we erased out the dried black wash in with a kneaded and rubber eraser. The grid lines came through from the pencil drawing stage. Also the first layer of the background went on. As you can see, it didn't cover the turp very well at all. Bummer...
4: Some of the grayscale painting went on anyway. But the eraser-drawing half helped this paint layer because of the large planes we have to sort through. There was white cut in against what will become painted gold. The greyscale painting will also help the future blue glazes on the cup and saucer.
5: Next, the colors of the gold in the cup were partitioned. And the first blue glaze went on the teacup (That took over a week to dry..)!
6: Detail work in the gold in the cup plus a little aureolin glaze to unify hues in the gold. A flat hue for the gold was put in around the bottom of the cup. The teacup white bottom is painted in a little more, in a direct way.
This painting is especially tricky because we have to make sure every plane reads perfectly, due to the very regular/perfect ellipses. Any bit of drawing that's innaccurate is sure to fight against whatever convincing quality we're trying to achieve. We have a loooong way to go on this yet....
Morinaga Milk Caramel Progress
So far, each painting is a real grab bag, every one seems to be coming to completion in different ways. Some require a black and white underpainting, some just plain direct painting, others require more transparent color glazes.
The only similarities are that each panel starts out with several layers of gesso which are power sanded. Also, because the surface is so smooth, there is also some kind of thin layer applied over the drawing so that the thicker layers of paint can adhere better and cover more opaquely in less time.
Here is the progress on one of the paintings. The painting is 17.25"x39". It's oil on panel.
 Here's what's going on here from left to right:
1: Initial pencil drawing on panel.
2: Refined Pencil drawing; top white tabs are lightly painted. The drawing was fixed with Crystal Clear.
3: Initial color wash in for all yellow, the lighter yellow has been wiped off with a rag; first opaque detail layer.
4: Second layer of yellow for the dark side of the box. (Notice how much lighter the grey got when it was surrounded by this darker yellow. That was not repainted!)
5: More detail work; first opaque color for the light yellow side of the box. The letters will be painted back in again (too much trouble to cut all the bright yellow around all the letters-- we'll know better next time).
6: First layer of background color was cut in around the box (The color was chosen when the painting was designed).
More progress on the way!
Subscribe to:
Posts (Atom)